Load Dynamics 365 F/SCM in Synapse and visualize in PowerBI
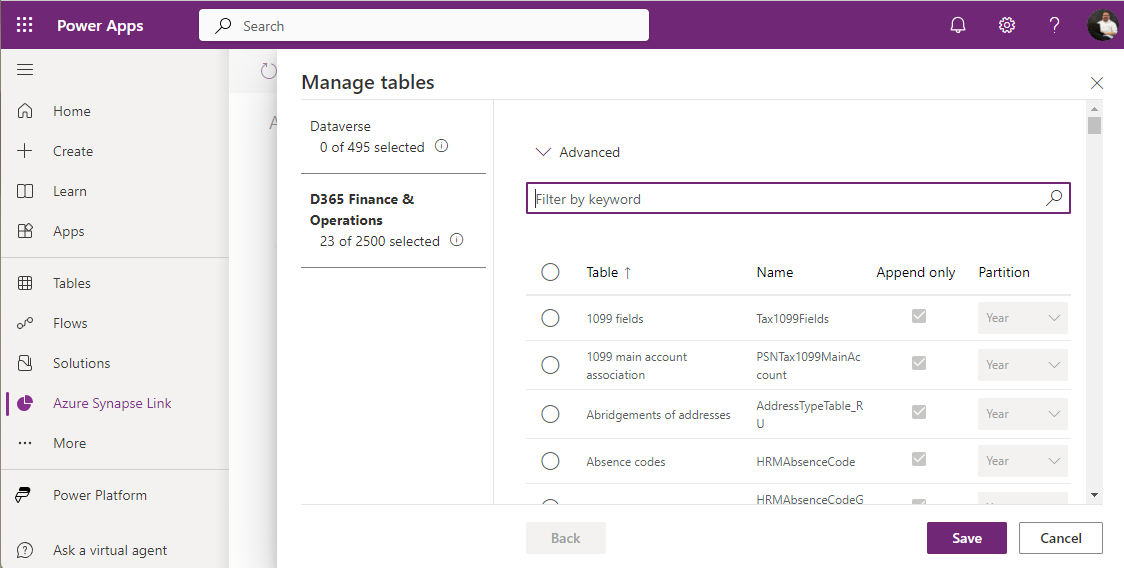
Synapse link for Dataverse is the replacement for Export to Datalake which has been deprecated in 2023. Although it is called link for Dataverse, it can be used to access Dynamics 365 Finance and Supply Chain tables (and CE data from dataverse as well).
SQL Track Changes has to be enabled in D365 F/SCM. Creates, Updates and Deletes are written to a storage account in CSV format. Synapse is running a spark pool that converts the CSVs into Deltalake format which relies on the (Open-Standard) Parquet format. As result you can see and query the F/SCM tables in the lake like it were tables in a relational database.
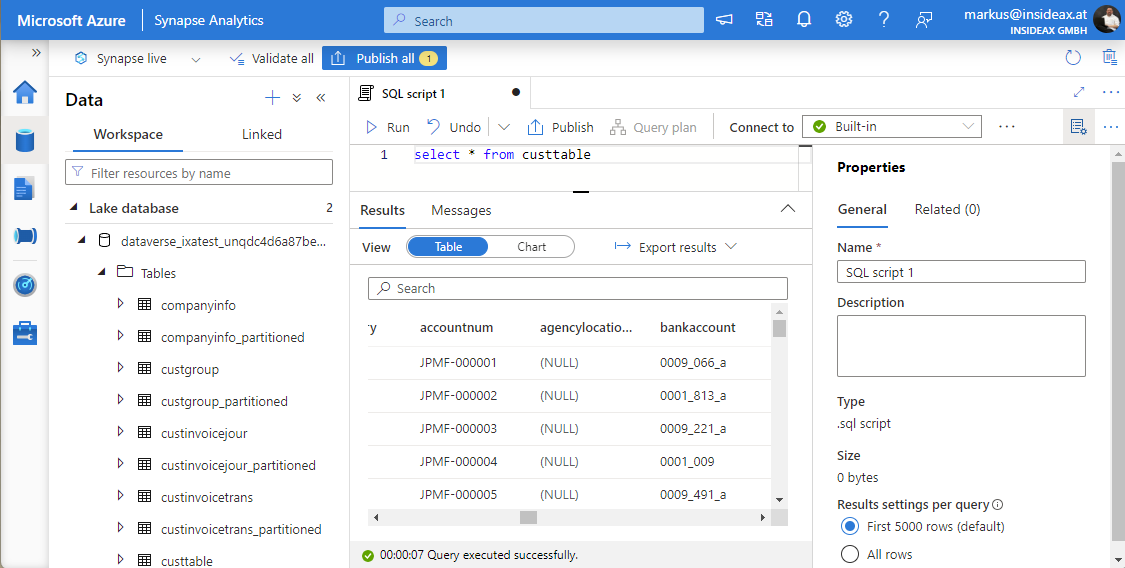
Good news, Synpase has a serverless SQL pool and a public SQL endpoint. You can find the SQL endpoint from the Manage Icon (down left) > SQL Pools > Select your pool > Workspace SQL Endpoint.
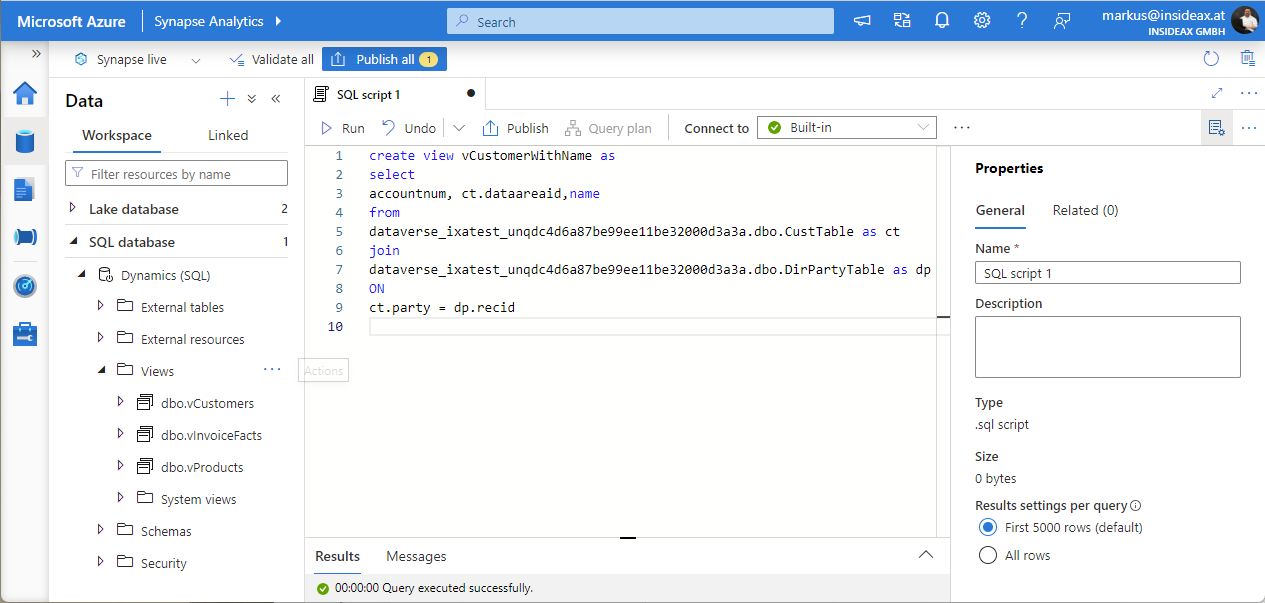
You can create databases in this SQL pool and create views based on the tables in the datalake. For example join CustTable and DirPartyTable and provide a view that contains customer data with a name and address.
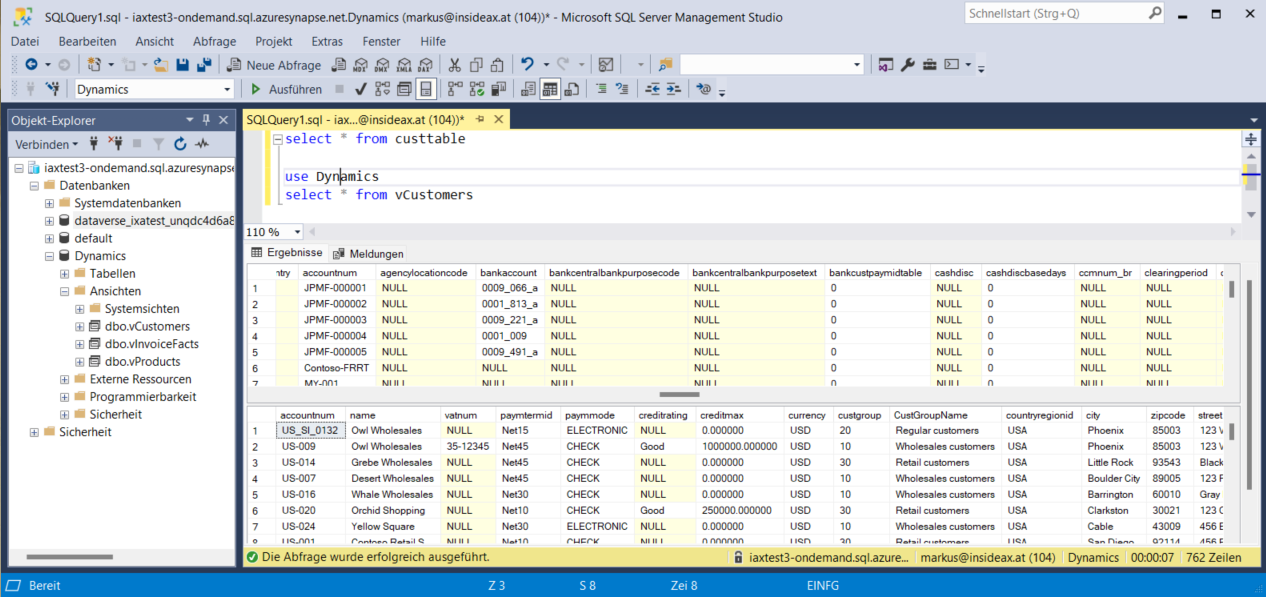
You can use the development workspace in Synapse web based workspace but you could also use other tools to connect e.g. SQL Server Management Studio. Tables in the datalake and views in another database can be accessed.
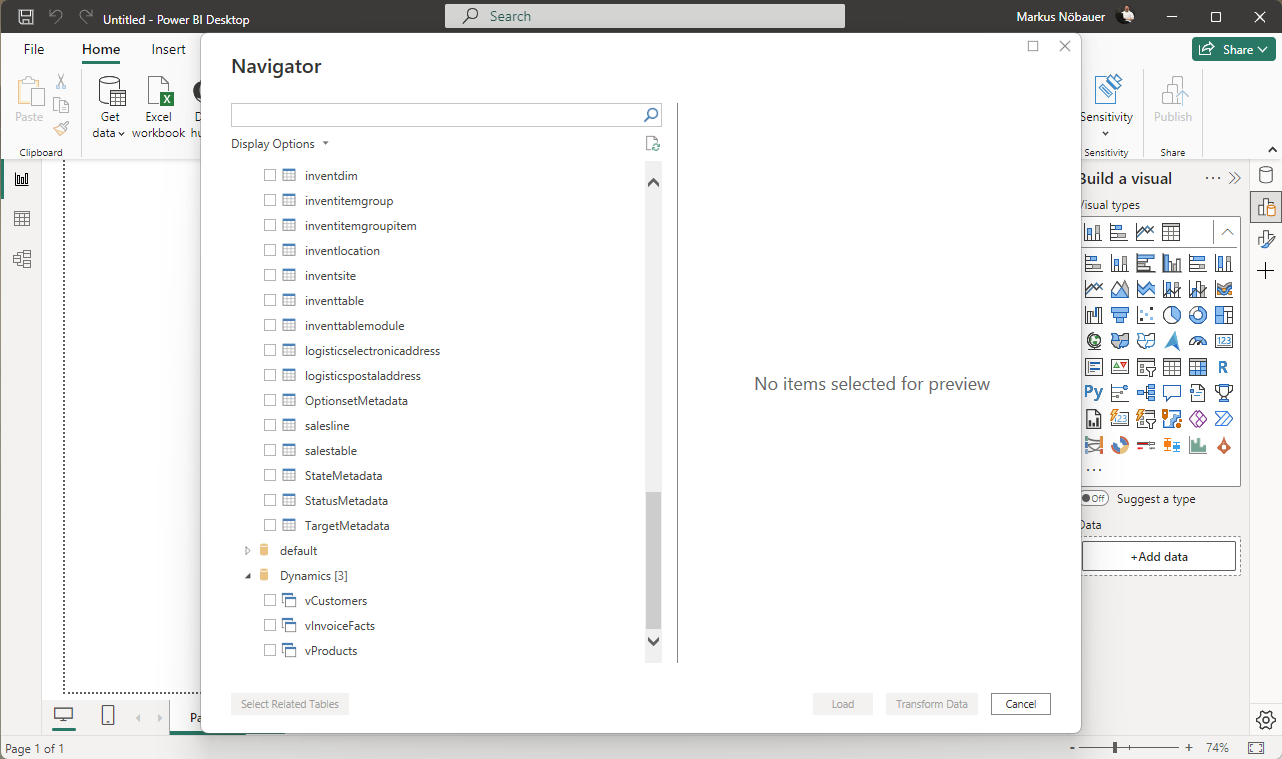
PowerBI has a built-in connector for Synapse Workspace. You can easily load data from the tables and also from the views.
Data Management in Dynamics 365 Finance and Supply Chain Management can be used to export Entities in different formats like XML. In many cases the default Entity schema is not what you want. However, you can easily transform the XML output by applying an XSLT transformation directly in Dynamics.
I’ve made a short video how to transform the EcoResReleasedProductsV2 XML entity export into another schema with different structure and element names.
Business Events in Dynamics 365 Finance and Supply Chain Management can be used to notify external systems in near-time when a certain event occurs in the ERP system. Dynamics 365 F/SCM comes with a set of predefined business events. You may want to develop you own specific business events to send data to another system. Three artifacts are needed for a custom Business Event. The contract that contains the data that is sent, the Business Event and at least one trigger. Here is an example for a Business Event that triggers when a new customer is created.
Required Model Dependencies:
Application Foundation
Application Suite
Directory
Contact Person
Contract
[DataContract]
public class ERPCustomerCreatedContract extends BusinessEventsContract
{
    protected Name name;

    [DataMember('Name'),BusinessEventsDataMember("Customer Name")]
    public Name parmName(Name _name = name)
    {
        name = _name;
        return name;
    }

    public static ERPCustomerCreatedContract newFromCustTable(CustTable _custTable)
    {
        ERPCustomerCreatedContract contract = new ERPCustomerCreatedContract();
        contract.parmName(_custTable.name());
        return contract;
    }
}
Business Event
[BusinessEvents(classStr(ERPCustomerCreatedContract),
                'Customer Created',
                'Customer Created',
                ModuleAxapta::Customer)]
public class ERPCustomerCreated extends BusinessEventsBase
{
    CustTable custTable;

    protected void new()
    {
    }

    public static ERPCustomerCreated newFromCustTable(CustTable _custTable)
    {
        ERPCustomerCreated event = new ERPCustomerCreated();
        event.parmCustTable(_custTable);
        return event;
    }

    public CustTable parmCustTable(CustTable _custTable = custTable)
    {
        custTable = _custTable;
        return custTable;
    }

    [Wrappable(false), Replaceable(false)]
    public BusinessEventsContract buildContract()
    {
        return ERPCustomerCreatedContract::newFromCustTable(custTable);
    }
}
Trigger
Make sure the trigger runs after inserted not on inserting 😉
class ERPCustTable_EventHandler
{
    [DataEventHandler(tableStr(CustTable), DataEventType::Inserted)]
    public static void CustTable_onInserted(Common sender, DataEventArgs e)
    {
        CustTable custTable = sender as CustTable;
        ERPCustomerCreated::newFromCustTable(custTable).send();
    }
}
Configuration
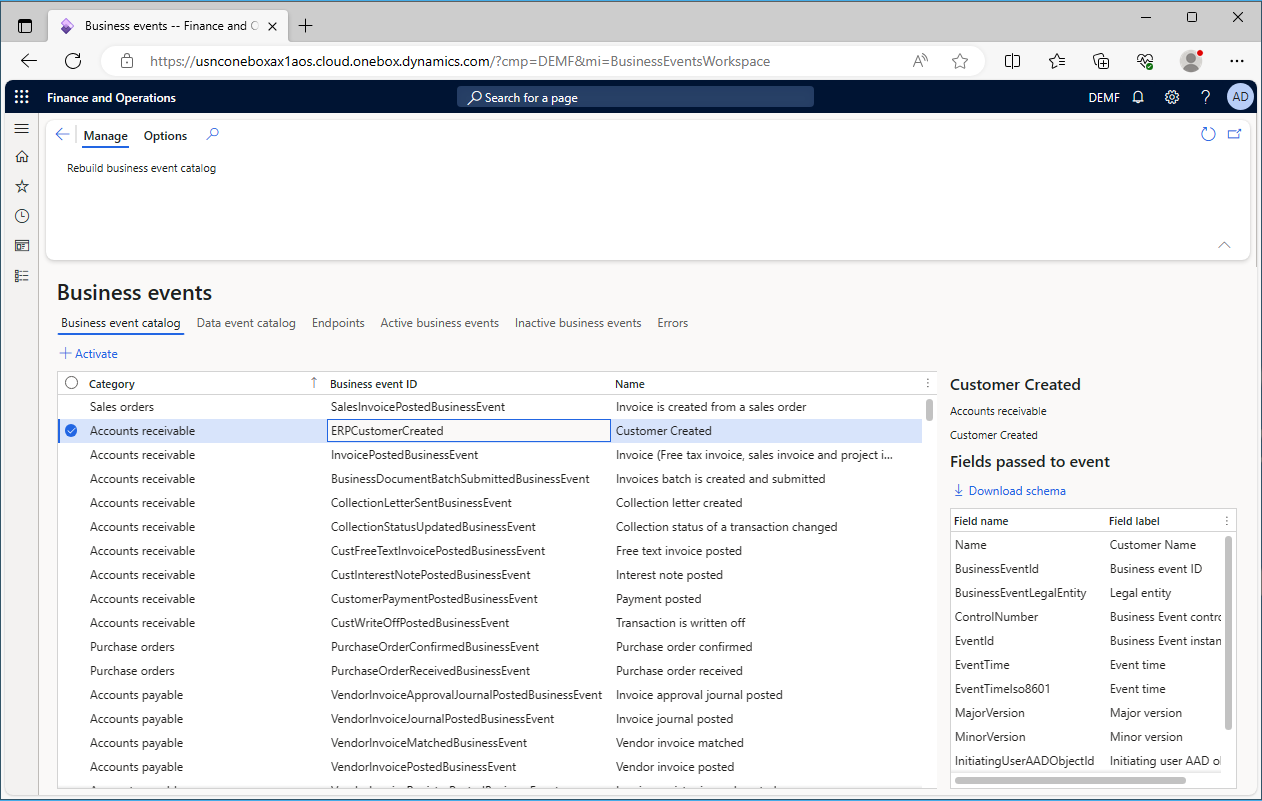
Make sure your code builds. In Dynamics 365 F/SCM open the Business Events Catalog. Rebuild the catalog to see your Business Event. Make sure you have an endpoint configured. Activate the Business Event. Create a new Customer. The Business Event will trigger and send the contract to your endpoint.
After creating a new customer, the Business Event triggers and sends the message to the configured endpoint. In my case it’s a Blob Storage in Azure. Here is the resulting JSON Message:
Aggregating values from a related table is a common task in PowerBI. However, there are many ways how to achieve this goal. Here are a few examples:
Note: I'm using an Adventure Works Lite Demo DB and using SalesOrderHeader + SalesOrderDetail to aggregate the LineAmount from the details.
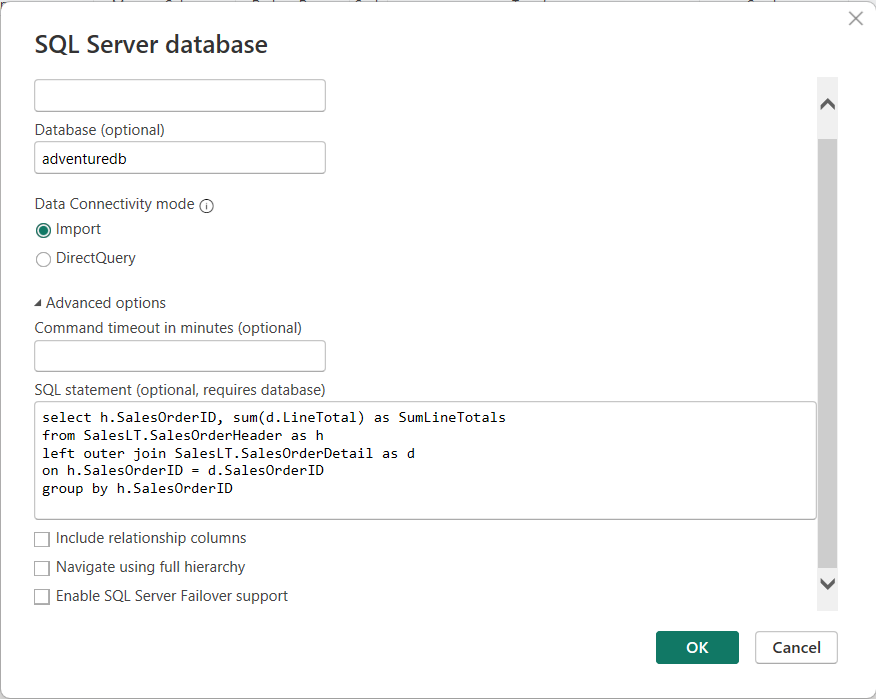
1) Aggregate at data source
If you have the option to push aggregation logic to the data source you should do so. Especially if the data source is SQL Server because its designed to execute queries and perform aggregations in a very effective way.
select h.SalesOrderID, sum(d.LineTotal) as SumLineTotals
from SalesLT.SalesOrderHeader as h
left outer join SalesLT.SalesOrderDetail as d
on h.SalesOrderID = d.SalesOrderID
group by h.SalesOrderID
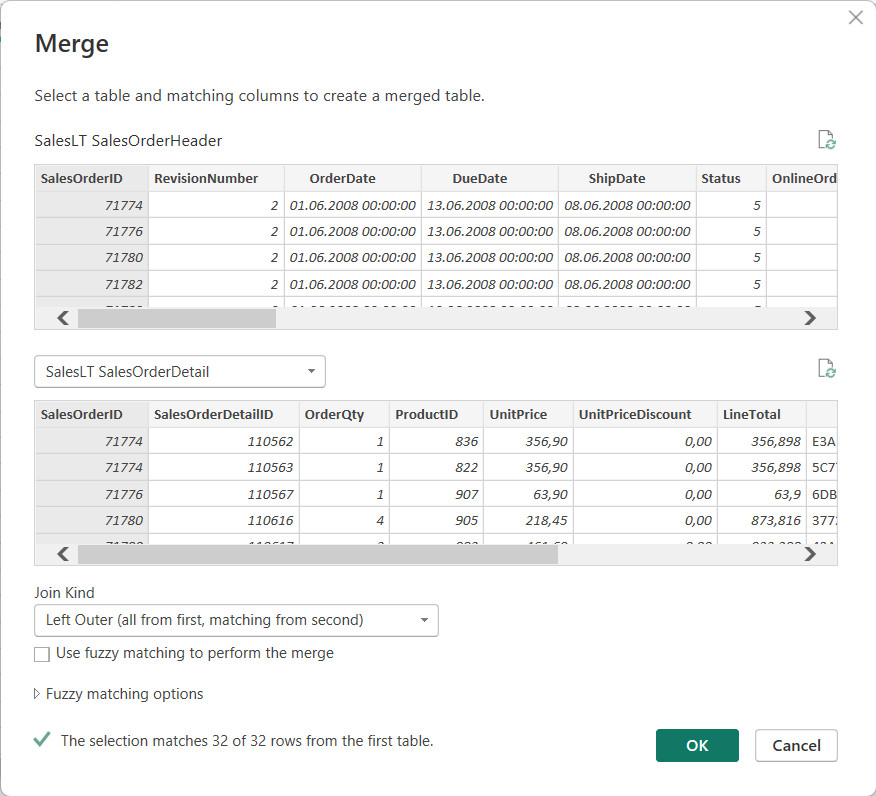
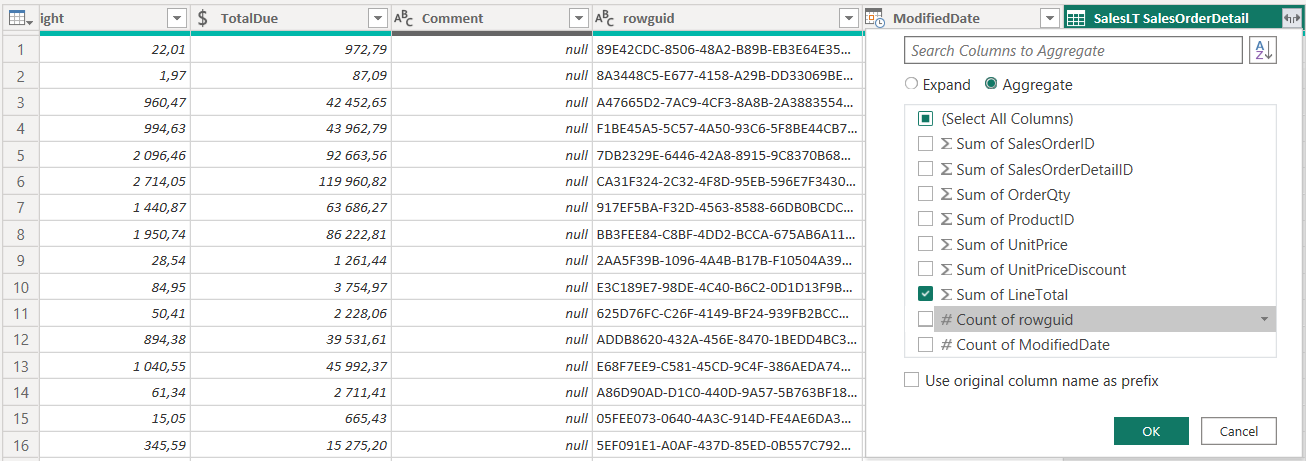
2) Join in Power Query
Load both tables using PowerQuery. Select the SalesOrderHeader table. From Home tab, select Merge Queries. Join both tables via SalesOrderID and select LEFT OUTER JOIN as join type.
Navigate the joined table but select Aggregate instead of Expand. Aggregate the LineTotals from the SalesOrderDetails.
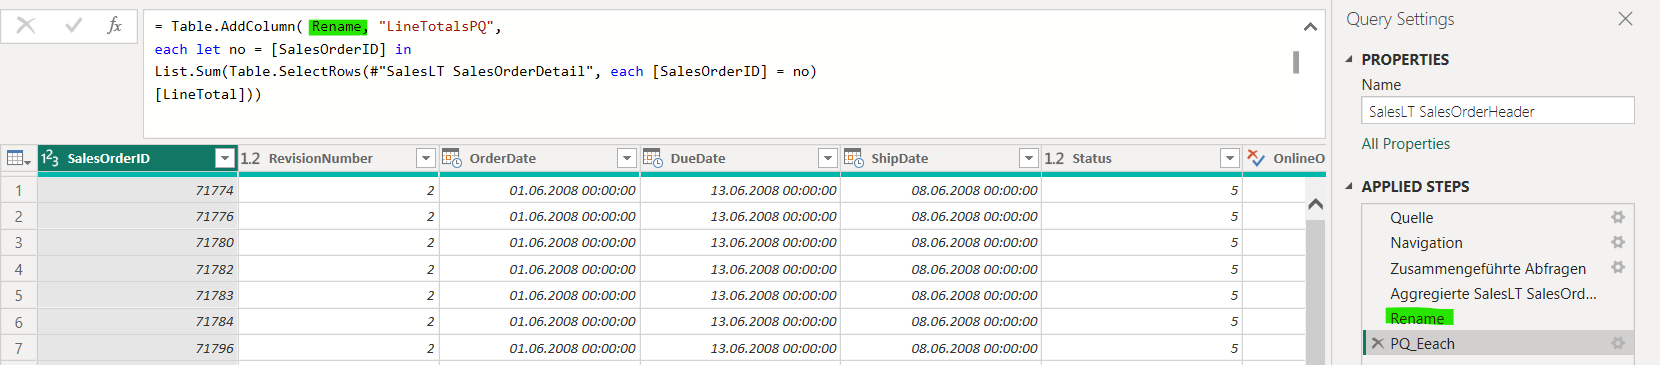
3) Calculated Column in Power Query (M)
You can also use PowerQuery to sum up values from another table. Note “Rename” is the name of the prev. Step in my PowerQuery.
= Table.AddColumn(Rename, "LineTotalsPQ",
each let no = [SalesOrderID]
in List.Sum(
Table.SelectRows(#"SalesLT SalesOrderDetail", each [SalesOrderID] = no)[LineTotal]
))
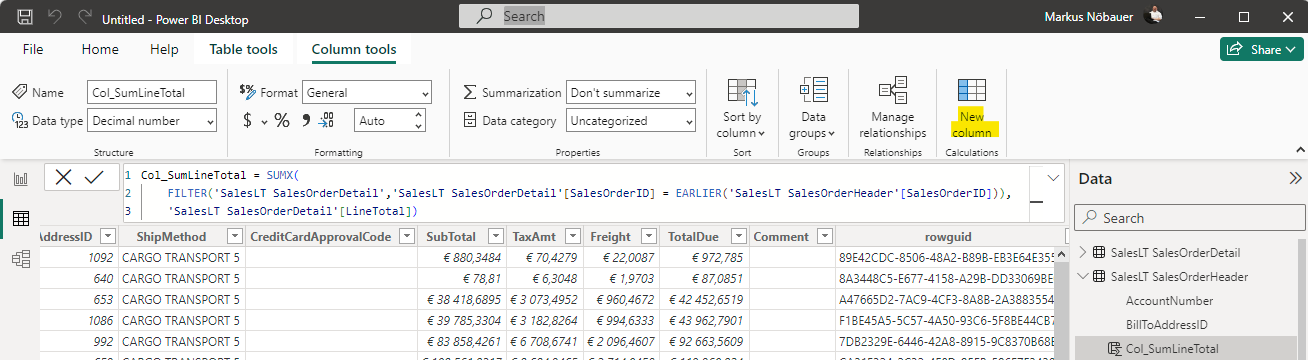
4) Calculated Column in Data Model (DAX)
Create a new column at the SalesOrderHeader in the data model using SUMX function.
Make sure you have an active 1:n relation from SalesOrderHeader to SalesOrderDetails via SalesOrderID. Create a new measure on the SalesOrderHeader using DAX.
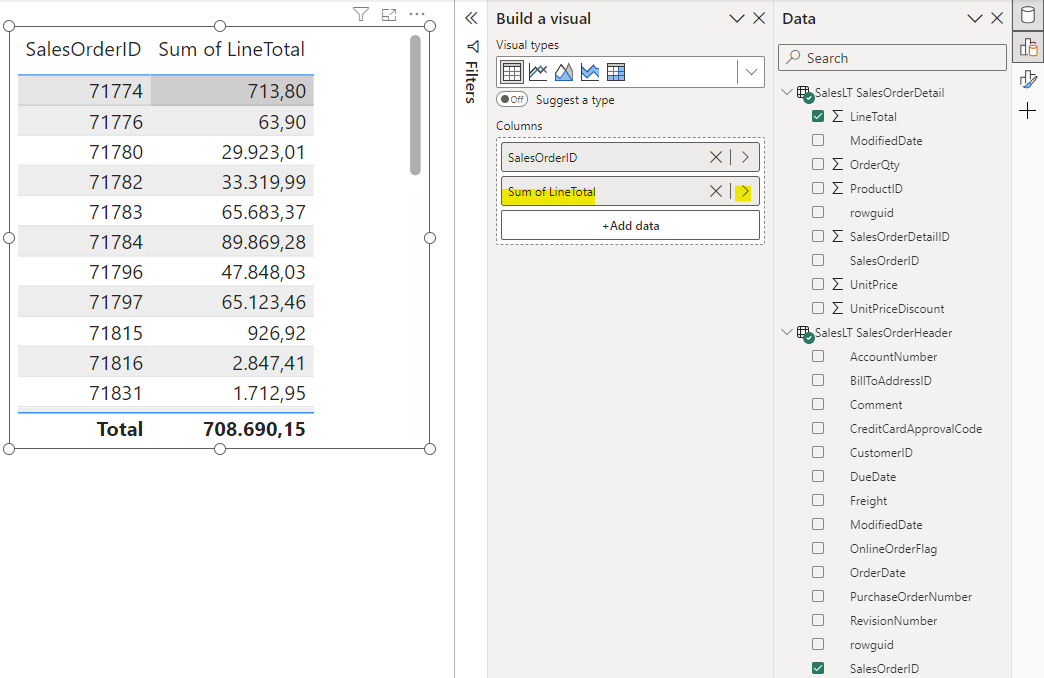
Add a table visual to the report and place the SalesOrderID and the measure from the SalesOrderHeader table.
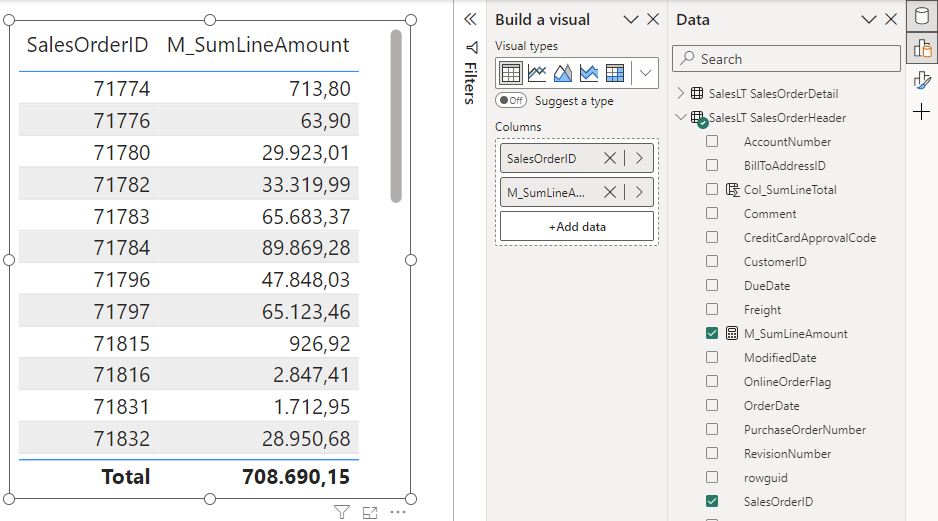
6) Visual
Make sure you have an active 1:n relation from SalesOrderHeader to SalesOrderDetails via SalesOrderID. Add a table visual and place the SalesOrderID from the SalesOrderHeader table. Add the LineAmount from the SalesOrderLines and choose to aggregate as Sum.
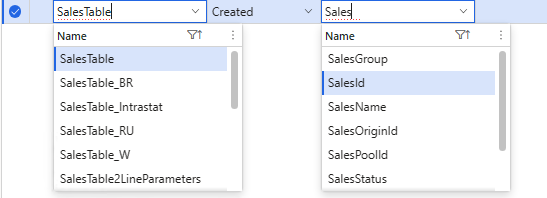
Reflection is used to dynamically retrieve metadata information from code artifacts dynamically at runtime. In older versions of Dynamics AX this was done using TreeNode framework which reflected the AOT structure. In Dynamics 365 Finance and Supply Chain Management you can use the MetadataSupport class.
Example: Table and its Fields
Create a temporary table that has a name field. The table will be dynamically populated with table names or field names. On the temporary table add 2 static methods to populate a table buffer with table names or field names.
public static TmpTableName populateTableName()
{
    TmpTableName _tmpTableName;
    var tables = Microsoft.Dynamics.Ax.Xpp.MetadataSupport::TableNames();
    while (tables.MoveNext())
    {
        _tmpTableName.clear();
        _tmpTableName.Name = tables.Current;
        _tmpTableName.insert();
    }
    return _tmpTableName;
}

public static TmpTableName populateFieldName(TableId _tableId)
{
     SysDictTable table = new SysDictTable(_tableId);
     Set fields = table.fields();
     SetEnumerator enum = fields.getEnumerator();
     TmpTableName _tmpTableName;

     while(enum.moveNext())
     {
         SysDictField field = enum.current();

         _tmpTableName.clear();
         _tmpTableName.Name = field.name();
         _tmpTableName.insert();
     }

     return _tmpTableName;
 }
Create a regular table that has 2 name fields, one for a table name and another for the field name. Overwrite the lookup method and provide the temporary table buffer as datasource.
When working on PowerBI projects for a longer time or supporting a customer, version control would be a desireable feature. In many cases PowerBI files are stored on file share or SharePoint. At this moment (August 2023) there is no integrated version control feature in PowerBI Desktop. But we can use featues from different software products to build a version control strategy for PowerBI.
There is a preview feature call “Save as PowerBI project” in PowerBI Desktop. This will split the PowerBI report into multiple files that contain the model definition, the report layout and some more files. Now that we have multiple files in a project folder, one can come up with the idea to put these files under a version control system.
You can use Git as version control system on your local PC or wherever the PowerBI reports are developed. Git has a local repository and can be connected to central repository. In Azure DevOps you can setup projects using Git as version control system. Connect your local PowerBI Git repository with Azure DevOps to manage your PowerBI report development.
JSON strings can easily be handled using the FormJSONSerialized class in Dynamics 365 FO. Here is an example:
// JSON with string and number
str jsonString = @'{"Name":"Dynamics 365","RefRecId":123456789}';
Data Contract
Create an X++ class that matchtes the properties and add the DataContract and DataMember attributes. The attribute name has to match the JSON property name. You can stick to the parm*() naming schema for the method.
[DataContract]
class ERPDataContract
{
    Name name;
    RefRecId refRecId;

    [DataMember("Name")]
    public Name parmName(Name _name = name)
    {
        name = _name;
        return name;
    }

    [DataMember("RefRecId")]
    public RefRecId parmRefRecId(RefRecId _refRecId = RefRecId)
    {
        refRecId = _refRecId;
        return refRecId;
    }
}
There are many ways how to access, import and export data in Dynamics 365 Finance & Supply Chain Management. Find here a one page PDF summary of 12 common ways. Every solution has it pros and cons.
PowerBI supports training machine learning models like classification and regression in PowerBI Online. In preparation for a webcast I’ve recorded the training of regression model to predict mean-time-to-failure. Watch the step-by-step guide in my ERPCoder Youtube Channel